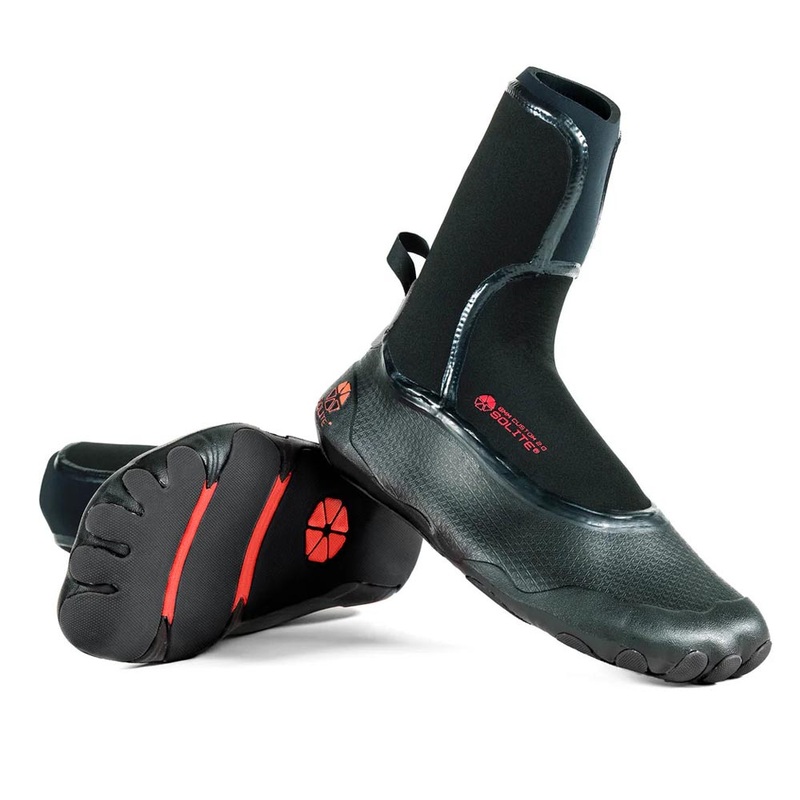
8mm Custom 2.0 Wetsuit Boots|UK4 | US5|UK5 | US6|UK6 | US7|UK7 | US8|UK8 | US9|UK 9 | US10|UK10 | US11|UK11 | US12|UK12 | US13|Black / Red
SimplyGame-Changing. Again.Recommended Water Temps:0C/32F+FULLDESCRIPTIONOur 8mm Custom gets theSolite 2.0 sole upgrade, changing the game again for barefoot feel, performance, warmth, and durability in the most frigid conditions.The 8mm Custom 2.0 integra
SimplyGame-Changing. Again.
Recommended Water Temps:0C/32F+
FULLDESCRIPTION
Our 8mm Custom gets theSolite 2.0 sole upgrade, changing the game again for barefoot feel, performance, warmth, and durability in the most frigid conditions.The 8mm Custom 2.0 integrates our 2.0 Sole in the cleanest, simplest package that essentially disappears on your feet. If you want the world’s lightest, barely-there boot, the 8mm Custom 2.0 is your answer.
KEY FEATURES
3D-Molded Natural Rubber Sole
Like all of our new 2.0 Series boots, the 8mm Custom 2.0 features a3D-molded 1mm natural rubber sole, wrapping up the toes and heel for increased durability and protection against rocks, urchins, and reef. The one-piece sole design leaves no exposed gaps between sole pods, insuring extra protection and durability.
Custom-Fit 2.0 Thermofoam Sole withRound Toe Design
Our patentedheat-moldable 2.0 Thermofoam solehas also been completely redesigned including aRound Toedesign for max warmth. The Thermo Foam Sole is 8mm thick in the toes/heels for extra protection and 7mm elsewhere.
UpgradedNeoprene Lining with Tatex Flex-Spine
Updates to the Custom 2.0 aren’t limited to the sole. We’ve also upgraded the outer lining material to the same one we use on the Custom Pros, improving durability and minimizingwater absorption.Further fortifying the exterior is our exclusiveTatex Flex Spine.The Flex Spine stiffens the back of the boot, actingas a shoe-horn for easy entry and also providinga sticky surface to grab your wetsuit leg and prevent flushing.The inside is lined with a plush quick-dry lining materialformax airflow, improving warmth and comfort.
EZ-O Cuff withOverkill Seams
OurEZ-O Cuff designprovides a seamless barrier against flushing with a larger panel than other o-ring seals, providing much easier on-off and reducing stress on the seams. To reduce bulk under the wetsuit leg and allow for easier on-off, the EZ-O panel is reduced to 5mm thickness. Since booties take serious abuse, we cut no corners on our neoprene seam construction. OurOverkill neoprene seamsare triple-glued, blind-stitched, then sealed on the exterior with liquid seam seal for maximum durability and longevity.
Reinforced Stealth-Loop
To ease on/off, we’ve integrated our low-profileStealth-Loopin the heel. The Stealth Loop is laminated between the neoprene and our co-molded rubber/textile heel reinforcement patch, providing incredible durability and pull-strength. The Stealth Loop is also Tatex-coated for extra strength and zero-water absorption.
1mm Neoprene Round-ToeHeat-Booster Socks in the Box
The 8mm Customs include a pair of our1mm Neoprene Round-Toe Heat-Booster Socksin the box. These socks are a critical component of our Solite “system”, particularly in the frigid waters where the 8mm Customs are used. Benefits of the 1mm Neoprene socks are numerous:
- Add 5-10F warmth to the boots for longer sessions in frigid conditions.
- Increase comfort with a soft, plush barrier between the foot and the Thermofoam sole.
- Make the boots easy on/off with a low-friction outer surface.
- Keep boots smelling fresh since the socks can be easily washed/dried separately.
SIZE GUIDE
Sizing Tip:Order your regular shoe size or half a size down, as they expand to fit when moulded. For example, if you are a size 10.5, order a 10. If you are a size 10, also order a size 10.NOTE:If your feet are exceptionally narrow or low volume, you may want to size down even more.
CHOOSING THE RIGHT SIZE
Solite Boots provide the absolute best performance, comfort, and warmth if they are sized and fit correctly. Here are some tips to make sure you get the correct sizeboots foroptimum fit:
If you have Average/Wide Feet:
You should purchase your sneaker size or half a size smaller. Solite Boots should fit tight out of the box, but the heat molding process will stretch them to the perfect size. If your boots feel too big out of the box in any dimension (length/width/arch), then we suggest you try a size down. Even if they feel tight out of the box, heat molding will expand the boots to a snug but comfortable fit.
NOTE:If you plan to use the 1mm neoprene Heat Booster Socks inside your boots, you may not have to size down. In fact, if you have wide feet you may even want to size uphalf a size if you plan to use the 1mm neoprene Heat Booster Socks. For example, if you are a wide size 10.5 and plan to use the 1mm neoprene Heat Booster Socks, asize 11 may be a better fit. This is particularly applicable to the 5mm boots, which won’t stretch in heat-molding as much as 3mm boots.
If you have Narrow/Low-Volume Feet:
You can go down 1 size from your sneaker size. By heat-molding, the boot will stretch to fit your length, and narrow/reduce volume to hug your narrower foot. Once again, the 3mm Boots will stretch more easily in heat-molding than the 5mm boots, so keep this in mind when choosing.
HEAT MOLDING INSTRUCTIONS
Solite Boots are the world’s first and only custom, heat-moldable watersports footwear. Custom fitting can be done in your kitchen with nothing more than a kettle of boiling water. To heat-mold your Solite boots, watch the video below and follow the instructions carefully. Do not use any other methods of heat molding except boiling water. Use of ovens, microwaves, heat guns, etc. will void your warranty.
STEP-BY-STEP
1. Bring water to a boil (you will need approximately 3 cups of boiling water per boot.)
2. While water is heating, roll down the cuffs of your Solite boots and place them in a sink.
3. Put on your Solite Heat Booster socks. These socks will help allow for a little extra space when the boots are being molded.
4. Once water comes to a full bubbling boil, gently pour into your Solite boots (in the sink), filling each to slightly below the seam where the neoprene upper is attached to the sole. See photo.
5. Wait 5 minutes for the boiling water to soften the sole material.
6. After 5 minutes, carefully pour out the hot water from your Solite boot (doing one boot at a time) and quickly rinse out the inside of the boot with cold water to lower the surface temperature and to prevent burning. Test with your hand as you will want to get your foot in as warm as you can comfortably stand.
7. Place your foot inside your Solite boot while wearing the Heat Booster sock (if you plan to wear the socks inside the boots). Make sure your big-toe sits comfortably in the toe cavity and your heel is flush in the heel pocket.
8. Repeat Steps 6 and 7 for the other boot.
9. Secure boot ankle straps if you have them.
10. Walk around in your Solite boots for the next 10-15 minutes, to ensure a comfortable fit while the material cools and molds to your foot shape.
11. Once your Solite Boots have cooled to room temperature, the molding process is complete. 5-7 minutes.
12. If you are unhappy with the fit, you can re-mold your Solite boots repeating the same steps above. Your Solite boots should feel completely comfortable, almost like part of your foot.

Reviews
There are no reviews yet.